Electronics by Manmohan Pal: 2018

Saturday, September 1, 2018

Police Siren using a Transistor DIY by Manmohan Pal

How to make Police Siren using a NPN Transistor


List of Components
NPN Transistor BC 547   x              1
Buzzer                              x              1
RGB LED                         x              1
Resistor 330 Ohm             x              1
Resistor 220 Ohm             x              1

Circuit Diagram


Steps
1)      Place Transistor on bread board
2)      Connect 330 Ohm resistor between base and emitter of BC 547
3)      Connect RGB LED between Base and Collector of the transistor
4)      Connect  a Buzzer with collector
5)      Place a resistor 220 Ohm parallel to the Buzzer
6)      Batter connecter such that +ve on the buzzer and –ve at the Emitter of the transistor

Manmohan Pal
Email: mannmohanpal@gmail.com
Whatsapp: 8989811397

Facebook Page

Youtube channel


http://electronics4ubymanmohanpal.blogspot.in/p/blog-page_2.html

https://manmohanpal.wordpress.com/led-blinking-circuit/

Twitter: @ManmohanPal15

Blog: http://electronics4ubymanmohanpal.blogspot.com/p/transformer-less-power-supply.html

http://electronics4ubymanmohanpal.blogspot.com/2018/08/what-is-resistor.html


Monday, August 20, 2018

How to make Darkness Sensor Circuit| Light Sensor Circuit| Simple LDR Ci...


Darkness Sensor Circuit| Light Sensor Circuit| Simple LDR Circuit -by Manmohan Pal


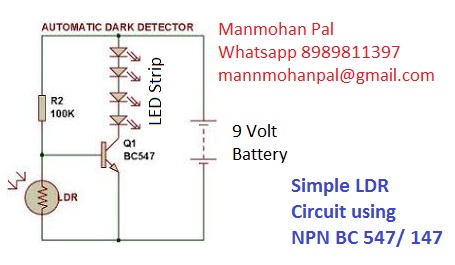
This is a simple Darkness sensor circuit made by using a single NPN transistor  BC 147/547 and a LDR with one 100 K Resistor,


The circuit can be used to make Automatic street lights, Automatic car headlights, Automatic Garden lights etc.


Circuit Diagram:

http://electronics4ubymanmohanpal.blogspot.com/2018/08/darkness-sensor-circuit.html


Components required to make a Simple LDR circuit are


NPN Transistor BC 147/547

LDR

100 K Resistor

12 Volt LED Strip

9 Volt Battery

Battery Connector


Subscrib My Youtube Channel To learn About Basic Electronics

https://www.youtube.com/channel/UCDnhARnHOEIPuNIEp5vPdGQ


https://www.youtube.com/watch?v=RcKvmXFsFuwhttps://www.youtube.com/watch?v=RcKvmXFsFuYYfkdsf Manmohan Pal WhatsApp 8989811397 mannmohanpal@gmail.com


Twitter: @ManmohanPal15


FaceBook Page: https://www.youtube.com/watch?v=RcKvmXFsFuw&t=242s


Blog: http://electronics4ubymanmohanpal.blogspot.com/2018/08/what-is-resistor.html


LED Flasher Circuit

http://electronics4ubymanmohanpal.blogspot.com/p/led-flasher-using-transistors-only.html


Dark Sensor Circuit

http://electronics4ubymanmohanpal.blogspot.com/2018/08/darkness-sensor-circuit.html


Remote Control ON/OFF Switch


IR LED emits infrared light, and used in TV remotes. This Infrared is received by the receiver TSOP17XX (TSOP 1738used in TV). TSOP17XX receives the modulated Infrared waves and changes its output. TSOP is available in many frequency ranges like TSOP1730, TSOP1738, TSOP1740 etc. Last two digits represent the frequency (in Khz) of modulated IR rays, on which TSOP responds. Like for example TSOP1738 reacts when it receives the IR radiation modulated at 38Khz. TSOP output is active low, means it becomes LOW when IR is detected.
In this remote controlled switch circuit we are using TV remote to ON/OFF the AC light by pressing any button of remote, and using the TSOP1738 at receiver end. Receiver circuit is connected to AC appliance via Relay, so that we can control the light remotely. We have used IC 4017 to convert it into a push ON, push OFF switch. Go through this article to understand the IR Transmitter and Receiver.
Normally when we press any button of TV/DVD player remote, Light glows and as soon as we release Button, it becomes OFF. Now it can be converted into a PUSH ON and PUSH OFF toggle switch using IC CD4017. IC CD4017 is a CMOS decade counter IC. It can produce output at the 10 pins sequentially, i.e. it produces output one by one at the 10 output pins. Output is switched to one pin to another by applying a clock pulse at pin 14. Learn more about IC 4017 here.
remote control switch


When firstly, power is applied to IC 4017, output at PIN 3 (Q0) is HIGH, when we press the button of IR remote, then a LOW to HIGH clock pulse is applied to PIN 14 (first clock pulse) and output at Q0 becomes low and PIN 2(Q1) becomes HIGH. PIN 2 triggers the RELAY module, and the AC light becomes ON. Now this position will remain until the next clock pulse. If we press the Button of IR remote again (second clock pulse), output at Q1 becomes LOW and Q2 becomes HIGH. This will deactivate the Relay and switch off the light. And because Q2 is connected to the RESET pin 15 of 4017, it will reset the IC and again output at Q0 becomes HIGH and Q2 becomes LOW (initial state). So it works like a toggle switch.
Output of TSOP1738 oscillates at the rate of 38KHz, which is applied to clock pulse of 4017. So we have connected a 1uF capacitor across the output of the TSOP so that this 38KHz pulse train is counted as one clock pulse to the IC 4017.
Video Link
We can also use the IR transmitter circuit to ON/OFF the Bulb, this IR transmitter circuit produces modulated IR at 38KHz like a TV remote. Also we can replace Bulb with any AC appliance, which is to be controlled by remote control.

Circuit Diagram
https://drive.google.com/open?id=19LMxDXTuDkb0W8pfx1JZW4kMqenVtAhJ


Manmohan Pal
Mob. 8989811397
Email- mannmohanpal@gmail.com
Blog: http://electronics4ubymanmohanpal.blogspot.in/p/blog-page_5.html
Youtube Channel: https://www.youtube.com/channel/UCDnhARnHOEIPuNIEp5vPdGQ

Remote control for every home appliance
https://www.youtube.com/watch?v=mUuSYWyD7Ic
Remote operated light- by Manmohan Pal
https://www.youtube.com/watch?v=5oP1SCkVJm8
Remote control Fan- IR remote control Circuit using IC 555 Timer by Manmohan Pal
https://www.youtube.com/watch?v=GvAZadfdIAE


Remote control Light Switch
https://manmohanpal.wordpress.com/2018/05/06/remote-control-circuit/

Remote control for every home appliance
Remote  control switch
http://electronics4ubymanmohanpal.blogspot.in/p/remote-control-switch.html

Remote Control On Off Switch

Remote control switch
Remote Controlled Light Switch


IR LED emits infrared light, and used in TV remotes. This Infrared is received by the receiver TSOP17XX (TSOP 1738used in TV). TSOP17XX receives the modulated Infrared waves and changes its output. TSOP is available in many frequency ranges like TSOP1730, TSOP1738, TSOP1740 etc. Last two digits represent the frequency (in Khz) of modulated IR rays, on which TSOP responds. Like for example TSOP1738 reacts when it receives the IR radiation modulated at 38Khz. TSOP output is active low, means it becomes LOW when IR is detected.
In this remote controlled switch circuit we are using TV remote to ON/OFF the AC light by pressing any button of remote, and using the TSOP1738 at receiver end. Receiver circuit is connected to AC appliance via Relay, so that we can control the light remotely. We have used IC 4017 to convert it into a push ON, push OFF switch. Go through this article to understand the IR Transmitter and Receiver.
Normally when we press any button of TV/DVD player remote, Light glows and as soon as we release Button, it becomes OFF. Now it can be converted into a PUSH ON and PUSH OFF toggle switch using IC CD4017. IC CD4017 is a CMOS decade counter IC. It can produce output at the 10 pins sequentially, i.e. it produces output one by one at the 10 output pins. Output is switched to one pin to another by applying a clock pulse at pin 14. Learn more about IC 4017 here.
remote control switch


When firstly, power is applied to IC 4017, output at PIN 3 (Q0) is HIGH, when we press the button of IR remote, then a LOW to HIGH clock pulse is applied to PIN 14 (first clock pulse) and output at Q0 becomes low and PIN 2(Q1) becomes HIGH. PIN 2 triggers the RELAY module, and the AC light becomes ON. Now this position will remain until the next clock pulse. If we press the Button of IR remote again (second clock pulse), output at Q1 becomes LOW and Q2 becomes HIGH. This will deactivate the Relay and switch off the light. And because Q2 is connected to the RESET pin 15 of 4017, it will reset the IC and again output at Q0 becomes HIGH and Q2 becomes LOW (initial state). So it works like a toggle switch.
Output of TSOP1738 oscillates at the rate of 38KHz, which is applied to clock pulse of 4017. So we have connected a 1uF capacitor across the output of the TSOP so that this 38KHz pulse train is counted as one clock pulse to the IC 4017.
Video Link
We can also use the IR transmitter circuit to ON/OFF the Bulb, this IR transmitter circuit produces modulated IR at 38KHz like a TV remote. Also we can replace Bulb with any AC appliance, which is to be controlled by remote control.

Circuit Diagram
https://drive.google.com/open?id=19LMxDXTuDkb0W8pfx1JZW4kMqenVtAhJ


Manmohan Pal
Mob. 8989811397
Email- mannmohanpal@gmail.com
Blog: http://electronics4ubymanmohanpal.blogspot.in/p/blog-page_5.html
Youtube Channel: https://www.youtube.com/channel/UCDnhARnHOEIPuNIEp5vPdGQ

Remote control for every home appliance
https://www.youtube.com/watch?v=mUuSYWyD7Ic
Remote operated light- by Manmohan Pal
https://www.youtube.com/watch?v=5oP1SCkVJm8
Remote control Fan- IR remote control Circuit using IC 555 Timer by Manmohan Pal
https://www.youtube.com/watch?v=GvAZadfdIAE


Remote control Light Switch
https://manmohanpal.wordpress.com/2018/05/06/remote-control-circuit/

Remote control for every home appliance
Remote  control switch
http://electronics4ubymanmohanpal.blogspot.in/p/remote-control-switch.html

Darkness sensor circuit

Darkness Sensor Circuit| Light Sensor Circuit| Simple LDR Circuit -by Manmohan Pal

This is a simple Darkness sensor circuit made by using a single NPN transistor  BC 147/547 and a LDR with one 100 K Resistor,

The circuit can be used to make Automatic street lights, Automatic car headlights, Automatic Garden lights etc.


Circuit Diagram:
http://electronics4ubymanmohanpal.blogspot.com/2018/08/darkness-sensor-circuit.html


Components required to make a Simple LDR circuit are

NPN Transistor BC 147/547
LDR
100 K Resistor
12 Volt LED Strip
9 Volt Battery
Battery Connector


Subscrib My Youtube Channel To learn About Basic Electronics
https://www.youtube.com/channel/UCDnhARnHOEIPuNIEp5vPdGQ

https://www.youtube.com/watch?v=RcKvmXFsFuwhttps://www.youtube.com/watch?v=RcKvmXFsFuYYfkdsf Manmohan Pal WhatsApp 8989811397 mannmohanpal@gmail.com

Twitter: @ManmohanPal15

FaceBook Page: https://www.youtube.com/watch?v=RcKvmXFsFuw&t=242s

Blog: http://electronics4ubymanmohanpal.blogspot.com/2018/08/what-is-resistor.html

LED Flasher Circuit
http://electronics4ubymanmohanpal.blogspot.com/p/led-flasher-using-transistors-only.html


Dark Sensor Circuit
http://electronics4ubymanmohanpal.blogspot.com/2018/08/darkness-sensor-circuit.html


Friday, August 10, 2018

What is Resistor ?

What is Resistor ?


A resistor is a passive two-terminal electrical component and its primary function is to limit the flow of electric current.
A resistor is a passive two-terminal electrical component that implements electrical resistance as a circuit element. In electronic circuits, resistors are used to reduce current flow, adjust signal levels, to divide voltages, bias active elements, and terminate transmission lines, among other uses. High-power resistors that can dissipate many watts of electrical power as heat, may be used as part of motor controls, in power distribution systems, or as test loads for generators. Fixed resistors have resistances that only change slightly with temperature, time or operating voltage. Variable resistors can be used to adjust circuit elements (such as a volume control or a lamp dimmer), or as sensing devices for heat, light, humidity, force, or chemical activity.


Youtube Video Link Video Link

Subscrib My Youtube Channel To learn About Basic Electronics
https://www.youtube.com/channel/UCDnhARnHOEIPuNIEp5vPdGQ

https://www.youtube.com/watch?v=RcKvmXFsFuwhttps://www.youtube.com/watch?v=RcKvmXFsFuYYfkdsf Manmohan Pal WhatsApp 8989811397 mannmohanpal@gmail.com
Twitter: @ManmohanPal15
FaceBook Page: https://www.youtube.com/watch?v=RcKvmXFsFuw&t=242s
Blog: http://electronics4ubymanmohanpal.blogspot.com/2018/08/what-is-resistor.html

Tuesday, July 31, 2018

How to find the value of a Resistor

How to find the value of a Resistor


Resistor is a device that opposes the flow of electrical current. The bigger the value of a resistor the more it opposes the current flow. The value of resistor is given in ohms and is often referred to as its resistance.


Sunday, April 29, 2018

Automatic Door Bell using IC 555 Timer by Manmohan Pal

Automatic Door Bell using IC 555 Timer by Manmohan Pal


We can buy IR sensor from market or through online shopping sites but it costs us around Rs. 150/- here in this tutorial I am going to Show You how to make an Infra Red Obstacle Sensor under Rs. 25/- . The sensor which we are going to make is suitable for Arduino Projects and various other applications.


Step by step tutorial to make IR Sensor

List of Items.
1) IC 555 Timer
2) IR diodes   x2
3) Capecitor 100mf / 16 v    x1
4)  Resistor -2    1k,  10k,
5) NPN transistor BC 548/ 547
6) Buzzer

Lets Begin the Project, Mount the IC 555 Time in the center of the Breadboard and follow the steps to make connection between components.

1) connect Pin no 8 to positive Terminal of Battery (4.7 Volt Mobile Battery)
2) Connect Pin no. 1 to the Negative Terminal of the battery.
3) Short Pin no. 6 and Pin no.7  with each other
4) connect 1K Resistor between IC's Pin no. 7 and Pin no. 8.
5) Place a  100 mf capacitor between IC's Pin no. 6 and Pin no. 1.
6) Place IR LED between IC's Pin no.1 and 2 such that the cathode of IR LED is at the Pin no.2
7) Place another IR LED Between IC,s Pin no. 1 and 8 with a 1k Resistor at anode of IR LED.
8) Connect a resistor between Pin no.3 and Base of NPN tansistor BC 547.
9) connect the Emiter of NPN Transistor BC 547 to negative supply of battery.
10 connect the Collector of NPN Transistor BC 547 to the Negative terminal of the Buzzer.
11) Connect the positive terminal of Buzzer to the Positive terminal of Battery.

 Now when an obstacle comes in front of both IR LED,s, the IR rays from Tx IR LED get reflected by the obstacle and reach the Rx IR LED. the IC 555 Time which is used in Monostable Mode get trigger (Low) at Pin no.2  thus it Provide High  at Output Pin no. 3 . and the NPN Transister passes Negative voltage to the buzzer, while the positive voltage is already connected to buzzer thus the buzzer starts ringing. the timing of the ringing can be controlled by the value of the capacitor and the resistor between IC,s pin no. 7 and 8.  


Circuit is complete enjoy the sensor with Arduino Projects.

Same circuit can be modified to Automatic Door Bel Circuit .  
Same circuit can be used in reverse parking of Automobiles to detect the obstacle distance.

Automatic Door Bell using IC 555 Timer
https://www.youtube.com/watch?v=1AnnUgl1y_c

 IR obstacle Sensor for Arduino Projects
http://electronics4ubymanmohanpal.blogspot.in/2018/04/ir-obstical-sensor-for-arduino-projects.html


Automatic Door Bell using IC 555 Timer by Manmohan Pal

http://electronics4ubymanmohanpal.blogspot.in/p/blog-page_80.html 


Feel free to ask any quary....

Manmohan Pal
Whatsapp: 8989811397
mannmohanpal@gmail.com

IR obstacle Sensor for Arduino Projects

We can buy IR sensor from market or through online shopping sites but it costs us around Rs. 150/- here in this tutorial I am going to Show You how to make an Infra Red Obstacle Sensor under Rs. 25/- . The sensor which we are going to make is suitable for Arduino Projects and various other applications.

Youtube Video Link.
https://www.youtube.com/watch?v=lqxUHl-0eIk


Step by step tutorial to make IR Sensor

List of Items.
1) IC 555 Timer
2) IR diodes   x2
3) Capecitor 100mf / 16 v    x1
4)  Resistor -2    1k,  10k,
5) LED (any colour)
6) Wires for connection


Lets Begin the Project, Mount the IC 555 Time in the center of the Breadboard and follow the steps to make connection between components.

1) connect Pin no 8 to positive Terminal of Battery (4.7 Volt Mobile Battery)
2) Connect Pin no. 1 to the Negative Terminal of the battery.
3) Short Pin no. 6 and Pin no.7  with each other
4) connect 1K Resistor between IC's Pin no. 7 and Pin no. 8.
5) Place a  100 mf capacitor between IC's Pin no. 6 and Pin no. 1.
6) Place IR LED between IC's Pin no.1 and 2 such that the cathode of IR LED is at the Pin no.2
7) Place another IR LED Between IC,s Pin no. 1 and 8 with a 1k Resistor at anode of IR LED.
8) Pin no. 3 is Output which will be in the form of Positive Pulse connect a LED (Any Colour).
9) Output LED will have its Anode at Pin no. 3 and cathode at IC,s Pin no. 1.

 Now when an obstacle comes in front of both IR LED,s, the IR rays from Tx IR LED get reflected by the obstacle and reach the Rx IR LED the the IC 555 Time which is used in Monostable Mode get trigger (Low) at Pin no.2  thus it Provide High  at Output Pin no. 3 . and the output LED glow up.


Circuit is complete enjoy the sensor with arduino Projects.

Same circuit can be modified to Automatic Door Bel Circuit . 
Same circuit can be used in reverse parking of Automobiles to detect the obstacle distance.

Autometic Door Bell using IC 555 Timer
https://www.youtube.com/watch?v=1AnnUgl1y_c

 IR obstacle Sensor for Arduino Projects
http://electronics4ubymanmohanpal.blogspot.in/2018/04/ir-obstical-sensor-for-arduino-projects.html


Thursday, March 22, 2018

Remote sensor Using TSOP1738 - by Manmohan Pal

Remote Sensor using TSOP1738

Remote sensor Using TSOP1738 - by Manmohan Pal


Remote sensor using TSOP1738

Remote proximity sensor


we can make remote infra red proximity sensor using TSOP 1738 and a transistor BC 558/ BC 557
it is a pnp transistor and the circuit is very simple to make. the components are easily available and cheap.

list of components

1) IR reciever TSOP 1738
2) PNP transistor BC 558
3) LED (Any colour)


Kindly watch the Youtube video link for more details:

https://www.youtube.com/watch?v=L5UNFSbLMaE 


By- Manmohan Pal
Email: mannmohanpal@gmail.coml
Whatsapp: 8989811397
Youtube Chennel: https://www.youtube.com/channel/UCDnhARnHOEIPuNIEp5vPdGQ


Saturday, March 3, 2018

Sweet Home 3d


Sweet Home 3D is a free interior design software application that allows for the planning and development of floor plans, as well as the ability to arrange furniture on it and view the results in 3D.


Features
Draw walls only.
Change the color or the texture of the walls, the floors and the ceilings, importing images of your own patterns if needed.
Drag and drop doors, windows and furniture onto the plan from a catalog of objects organized by categories, in which you can import 3D models created by yourself or downloaded from the web.
Customize the size, the orientation, the elevation, the colors and the textures of each piece of furniture.
View the changes in the plan simultaneously in a 3D view, in which you can navigate either from an aerial view point, or from a virtual visitor view point.
Annotate the plan with room areas, dimension lines, texts and show the North direction with a compass rose.
Create a photo realistic image of your arrangement depending on the time of the day and the light sources placed in the plan.
Create a video from a virtual path in the 3D view.
Print the home plan and the 3D view or export them in files at PDF, PNG, JPEG, SVG, OBJ standard formats, to reuse designed homes in other software.
Extend the features of Sweet Home 3D with plug-ins programmed in Java, or by developing a derived version based on its Model View Controller architecture.


Manmohan Pal
Whatsapp- 8989811397
Email- mannmohanpal@gmail.com


Tuesday, February 6, 2018

LED CHASER

LED Chaser

LED chaser circuit using IC 555 Timer and 4017 Decade counter by Manmohan Pal


Sequential running LED lights 


Using IC 555 Timer and IC CD 4017


LED Chaser circuits using IC 4017 + IC 555


If you want to build a 10 LED Chaser circuit we suggest this circuit first. It uses popular IC is a simple and affordable IC-4017_decade counter and IC-555.


As circuit diagram below is LED chaser circuit which The CD4017 act as LED driver in 10 output, by LED will glow only one in a rapid sequence. And control to speed with VR1 which is setting frequency output of a basic astable or free-running pulse generator with IC-555 as main.


10 LED Chaser Circuit


This is the circle 10 LED running light as another kind of string light circuit. Which is running light on circle each one step beautifully and can adjust speed as well.
The working principle
From circuit will see that we use two ICs. Which is IC1-NE555 as timer IC with a widely used general. In this circuit will use the IC-555 as the square wave generator to output. Which that frequency is determined by R-2.7K, R-470 ohms and C-10uF 16V.


In addition yet has a VR1-potentiometer-10K is frequency adjuster. When IC1-NE555 generate the frequency up, will be entered to IC2-CD4017 by through way of R 100 ohms. IC2 is Decade Counter IC will provide output is positive voltage Sort by Position according to input signal from IC1-NE555 One end of the LED all. Which is pin K to pooling through R 1K to ground to as the through way of current.

Youtube link for easy LED chaser circuit

https://www.youtube.com/watch?v=Ohuu0gyTOBU


How to assemble circuits
You can build the PCB as layout in Figure 2. Then Put all parts in PCB as components layout in Figure 3. Firstly, put small components type such as R, C, LED and socket IC in to PCB. When solder finish, should check correctly. Next bring both IC insert in to socket, careful do not Wrong terminal. When check all thing correct then enter power supply into the circuit. Then, adjust trimmer potentiometer and noticed the running of LED if all what work normally so can use it now.


The components List.


1. IC-CD4017  Decade Counter IC -                  1 pcs.
2. IC-NE555 Timer IC-                                      1 pcs.
3. C-10uF 16V- Electrolytic capacitors-             2 pcs.
4. R-2.7K- Resistors- 1/4 W 5%-                        1 pcs.
5. R-470 ohms- Resistors- 1/4 W 5%-                1 pcs.
6. R_1K Resistors- 1/4 W 5%-                            1 pcs.
7. VR_10K__trimer-potentiometer- _                 1 pcs.
8. LED (any colour )                                        10 pcs.


Please refer more videos and interesting videos


Please subscribe my Youtube channel

https://www.youtube.com/user/mannmohanpal

Manmohan Pal
Whatapp 8989811397
mannmohanpal@gmail.com

Blog:
http://electronics4ubymanmohanpal.blogspot.in/p/blog-page_2.html https://manmohanpal.wordpress.com/led-blinking-circuit/


Twitter: 
@ManmohanPal15

Facebook Page:
https://www.facebook.com/mannmohan.pal.7
https://www.facebook.com/Electronics-by-Manmohan-Pal-1802344069857656/?view_public_for=1802344069857656

Monday, February 5, 2018

LDR Circuit : Automatic Street Light

 Automatic Street Light
Science Project
Simpal LDR Circuit using IC 555 Timer: Automatic Street Light DIY by Manmohan Pal


Here we have explained a dark detector circuit by using 555 timer IC and a LDR (Light Dependent Resistor) which senses the light in surroundings and if it does not find the light, it triggers the IC and glows an LED attached with the circuit. In place of LED we can also use a buzzer or speaker to use it as dark detector alarm. The concept of this LDR circuit is quite simple and based on the working of LDR. So lets first understand more about LDRs.


Video link : LDR circuit using IC 555 Timer

https://www.youtube.com/watch?v=1gwUOnkJzxY


LDRs are a type resistors made from semiconductor materials to enable them to have their light sensitive properties. There are many types of LDRs but one of the most popular material used is cadmium sulphide (CdS). These LDRs or also known as photo resistors works on the principle of “Photo Conductivity”. Now what this principle says is , whenever light falls on the surface of the LDR (in this case) the conductance of the element increases or in other words the resistance of the LDR falls when the light falls on the surface of the LDR. This property of the decrease in resistance for the LDR is achieved because it is a property of semiconductor material used on the surface.


Here in this dark detecting LED circuit, LDR is configured with 555 timer IC in ASTABLE mode in such a way that 555 ASTABLE generates square wave when the light intensity goes below a certain level.


1. pin no 6 is connected to pin no 2
2. pin no 4 is connected to pin no 8
3. a resistor of 5 k is connected between pin no 1 and pin no 2
4. a LDR is placed between pin no 4 and pin no 2
5. LED is connected between pin no 1 and pin no 3


When there is dark on LDR the LEDs are ON  i.e. at night lights will glow automatically
Where there is light on LDR the LEDs are off  i.e. in day time lights are off automatically


above figure shows the circuit diagram of dark detecting LED. This circuit shows how we can convert a simple astable mode circuit to a “dark sensor”. We just need to add an LDR and a resistor in the circuit, then it simply works as dark detector. A general purpose LDR is used for sensing the light. When proper light is falling on the LDR its resistance is very low. When there is no light the LDR resistance increases. At this time the IC is triggered and glows the LED attached with the circuit


Manmohan Pal
Mob. 8989811397
Email- mannmohanpal@gmail.com
Youtube Channel: https://www.youtube.com/channel/UCDnhARnHOEIPuNIEp5vPdGQ

Automatic Street Light Circuit


Sunday, February 4, 2018

Logic Gates

AND Gate


Logic AND Gate Tutorial

A Logic AND Gate is a type of digital logic gate that has an output which is normally at logic level “0” and only goes “HIGH” to a logic level “1” when ALL of its inputs are at logic level “1”.

The output state of a “Logic AND Gate” only returns “LOW” again when ANY of its inputs are at a logic level “0”. In other words for a logic AND gate, any LOW input will give a LOW output.
The logic or Boolean expression given for a digital logic AND gate is that for Logical Multiplication which is denoted by a single dot or full stop symbol, ( . ) giving us the Boolean expression of:  A.B = Q.
Then we can define the operation of a 2-input logic AND gate as being:


Symbol Truth Table
2-input AND gate
2-input AND Gate
B A Q
0 0 0
0 1 0
1 0 0
1 1 1
Boolean Expression Q = A.B Read as A AND B gives Q           

 
Follow the link to make And gate demonstration science project 


7408 Quad 2-input AND Gate

7408 logic and gate
In the next tutorial about Digital Logic Gates, we will look at the digital logic OR Gate function as used in both TTL and CMOS logic circuits as well as its Boolean Algebra definition and truth tables.